Xcode Build Configuration Files allow us to create builds of an app that work differently with a backend that has staging and production environments.
The goal is to have one target that outputs both My App and My App QA based on which build scheme is selected. My App will communicate with the production backend, whereas My App QA will communicate with the staging backend.
Create and Setup Xcode Build Configuration Files
To accomplish this, we need four .xcconfig files:
staging.debug.xcconfigstaging.release.xcconfigproduction.debug.xcconfigproduction.release.xcconfig
Xcode’s “New File” template chooser has a “Configuration Settings File” option. Use that to get started.
// File: staging.debug.xcconfig

// --- Debug Build Settings --
ONLY_ACTIVE_ARCH = YES
DEBUG_INFORMATION_FORMAT = dwarf
ENABLE_TESTABILITY = YES
GCC_OPTIMIZATION_LEVEL = 0
GCC_PREPROCESSOR_DEFINITIONS = DEBUG=1 $(inherited)
SWIFT_OPTIMIZATION_LEVEL = -Onone
SWIFT_ACTIVE_COMPILATION_CONDITIONS = DEBUG

// --- Staging Build Settings --
PRODUCT_BUNDLE_IDENTIFIER = com.fishhook.qa.myapp
INFOPLIST_FILE = MyApp/Info-QA.plist
ASSETCATALOG_COMPILER_APPICON_NAME = AppIcon-QA
ASSETCATALOG_COMPILER_LAUNCHIMAGE_NAME = LaunchImage-QA
// File: staging.release.xcconfig
// --- Release Build Settings --
VALIDATE_PRODUCT = YES
SWIFT_COMPILATION_MODE = wholemodule
// --- Staging Build Settings --
PRODUCT_BUNDLE_IDENTIFIER = com.fishhook.qa.myapp
INFOPLIST_FILE = MyApp/info-qa.plist
ASSETCATALOG_COMPILER_APPICON_NAME = AppIcon-QA
ASSETCATALOG_COMPILER_LAUNCHIMAGE_NAME = LaunchImage-QAYou can start to see how these build configuration files support our goal. Each file specifies build settings that apply to the different ways we want the target built.
To build two apps that behave differently from the same target, the INFOPLIST_FILE and PRODUCT_BUNDLE_IDENTIFIER build settings are what we need to focus on.
PRODUCT_BUNDLE_IDENTIFIER is commonly referred to as the “Bundle ID.” We see this setting all over App Store Connect and what Apple platforms use to uniquely identify an application. In our example, we’re using com.fishhook.qa.myapp for staging builds, and com.fishhook.myapp for production builds.
INFOPLIST_FILE is the info.plist file that is used by the app bundle for things like the App’s Display Name and Privacy Descriptions. We’ll need to make sure we have two info.plist files in our app: info.plist for production and info-qa.plist for staging.
Associate .xcconfig with Configurations
With our .xcconfig files setup, we need to tell the Configurations to use them. Click on the project in the Xcode File Navigator. Click on the project in the column that lists projects and targets. Click on the “Info” tab.

As you can see, the default Configurations in a new Xcode 11.2.1 project are “Debug” and “Release.”
Click the plus button to create a new configuration, and you’re prompted to duplicate one of the existing configurations. Make a new configuration based on Debug and make a new configuration based on Release. Rename the two “Debug” configurations “Staging (Debug),” and “Production (Debug).” Rename the two “Release” configurations “Staging (Release),” and “Production (Release).”
For each of these configurations, click the disclosure triangle and associate the appropriate .xcconfig file with the project.
staging.debug.xcconfigwith “Staging (Debug)”staging.release.xcconfigwith “Staging (Release)”production.debug.xcconfigwith “Production (Debug)”production.release.xcconfigwith “Production (Release)”

Setup the Build Schemes
Our second to last step is get the build schemes setup so we have an easy way to pick between building staging or production.
Click the scheme picker and choose “Manage Schemes…” Click on the existing scheme for your app. Click the gear icon and choose “Duplicate.” Click-and-hover to rename each scheme: “My App (Staging)” and “My App (Production)”.

Double clicking a scheme will take you to the Scheme Editor. From here, each of the Products (Run, Test, Profile, Analyze, and Archive) can use a specific build setting. Run, Test, and Analyze should use a “Debug” setting. Profile and Archive should use a “Release” setting.

Accessing build values from your app
You should now be able to build and run a staging or production version of your app using the scheme picker. Our final step is going back and modifying our .xcconfig files with the values that are dynamic based on staging or production.
// File: staging.debug.xcconfig

...

// --- Staging Build Settings --
...
API_HOSTNAME: api-staging.example.com

// -----------------------------

// File: production.debug.xcconfig

...

// --- Staging Build Settings --
...
API_HOSTNAME: api.example.com
Build settings and their values are only available at build time, so we need to have the value of this new, custom build setting – API_HOSTNAME – copied somewhere we can access it at runtime.
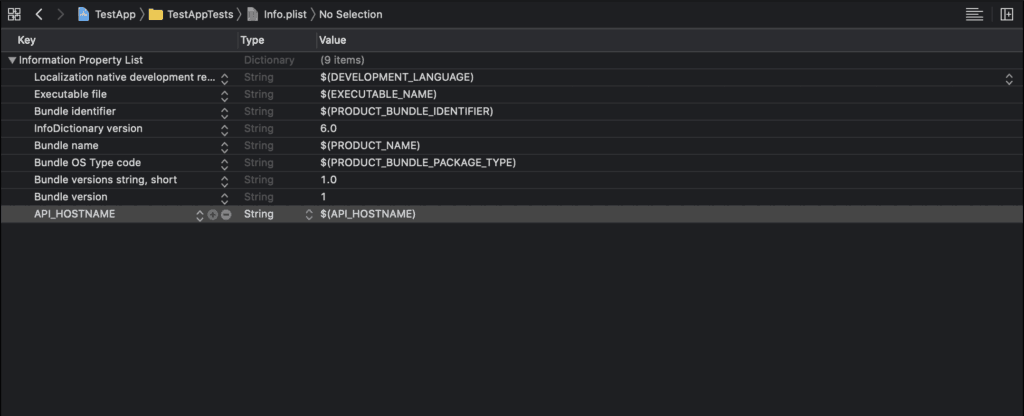
The simplest thing to do is copy it into our info.plist file since there is an easy to use API to access those values. Add the API_HOSTNAME key to both info plist files, and for the value make it the build setting variable $(API_HOSTNAME).
Now we can grab that value at runtime.
    func application(_ application: UIApplication, didFinishLaunchingWithOptions launchOptions: [UIApplication.LaunchOptionsKey: Any]?) -> Bool
    {
        guard let hostname = Bundle.main.object(forInfoDictionaryKey: "API_HOSTNAME") as? String,
            let url = URL(string: hostname) else {
                fatalError("Developer Error: Unable to read API_HOSTNAME from info plist")
        }

        Client.shared.configure(with: url)

        return true
    }
Conclusions
Xcode Build Configuration Files manage the complexity that exists for apps that require multiple build variants. Using .xcconfig files is a more scalable option than having multiple build targets. Furthermore, using config files decrease source control merging conflicts.